This is the one the whole series has been building towards. You now know containers, the essential and content widgets, the design controls, a global system and responsive modes. In this part we put every piece together and build a complete landing page from scratch — hero to footer — in a single sitting. Follow along and you’ll finish with a real, publishable page you built entirely yourself.
📚 Part 9 of my in-depth Elementor series (within my WordPress Plugin Guides). New here? Start with Part 1: Installing Elementor.
The plan: seven sections, top to bottom
Every effective landing page is really just a handful of sections stacked in a sensible order. Here’s the structure we’ll build — and you already know how to make every single one of them:
- Hero — a container with a background image and overlay, an H1, a sub-line and a button (Part 4).
- Features — a “Why choose us” heading over a three-column row of cards (Parts 3 & 6).
- Image + text — a two-column split: a screenshot on one side, a benefit list and button on the other.
- Services — a row of icon-boxes on a bold colored band (Part 5).
- Testimonial — a centered customer quote with a name and rating for social proof.
- FAQ — an Accordion answering the common questions (Part 5).
- Call to action — a final bold band with one clear next step.
The finished page
Build those seven sections in order, alternate the backgrounds so each one stands apart, keep your spacing and colors consistent (your design system from Part 7 does the heavy lifting here), and this is what you end up with — a clean, complete, conversion-ready landing page:
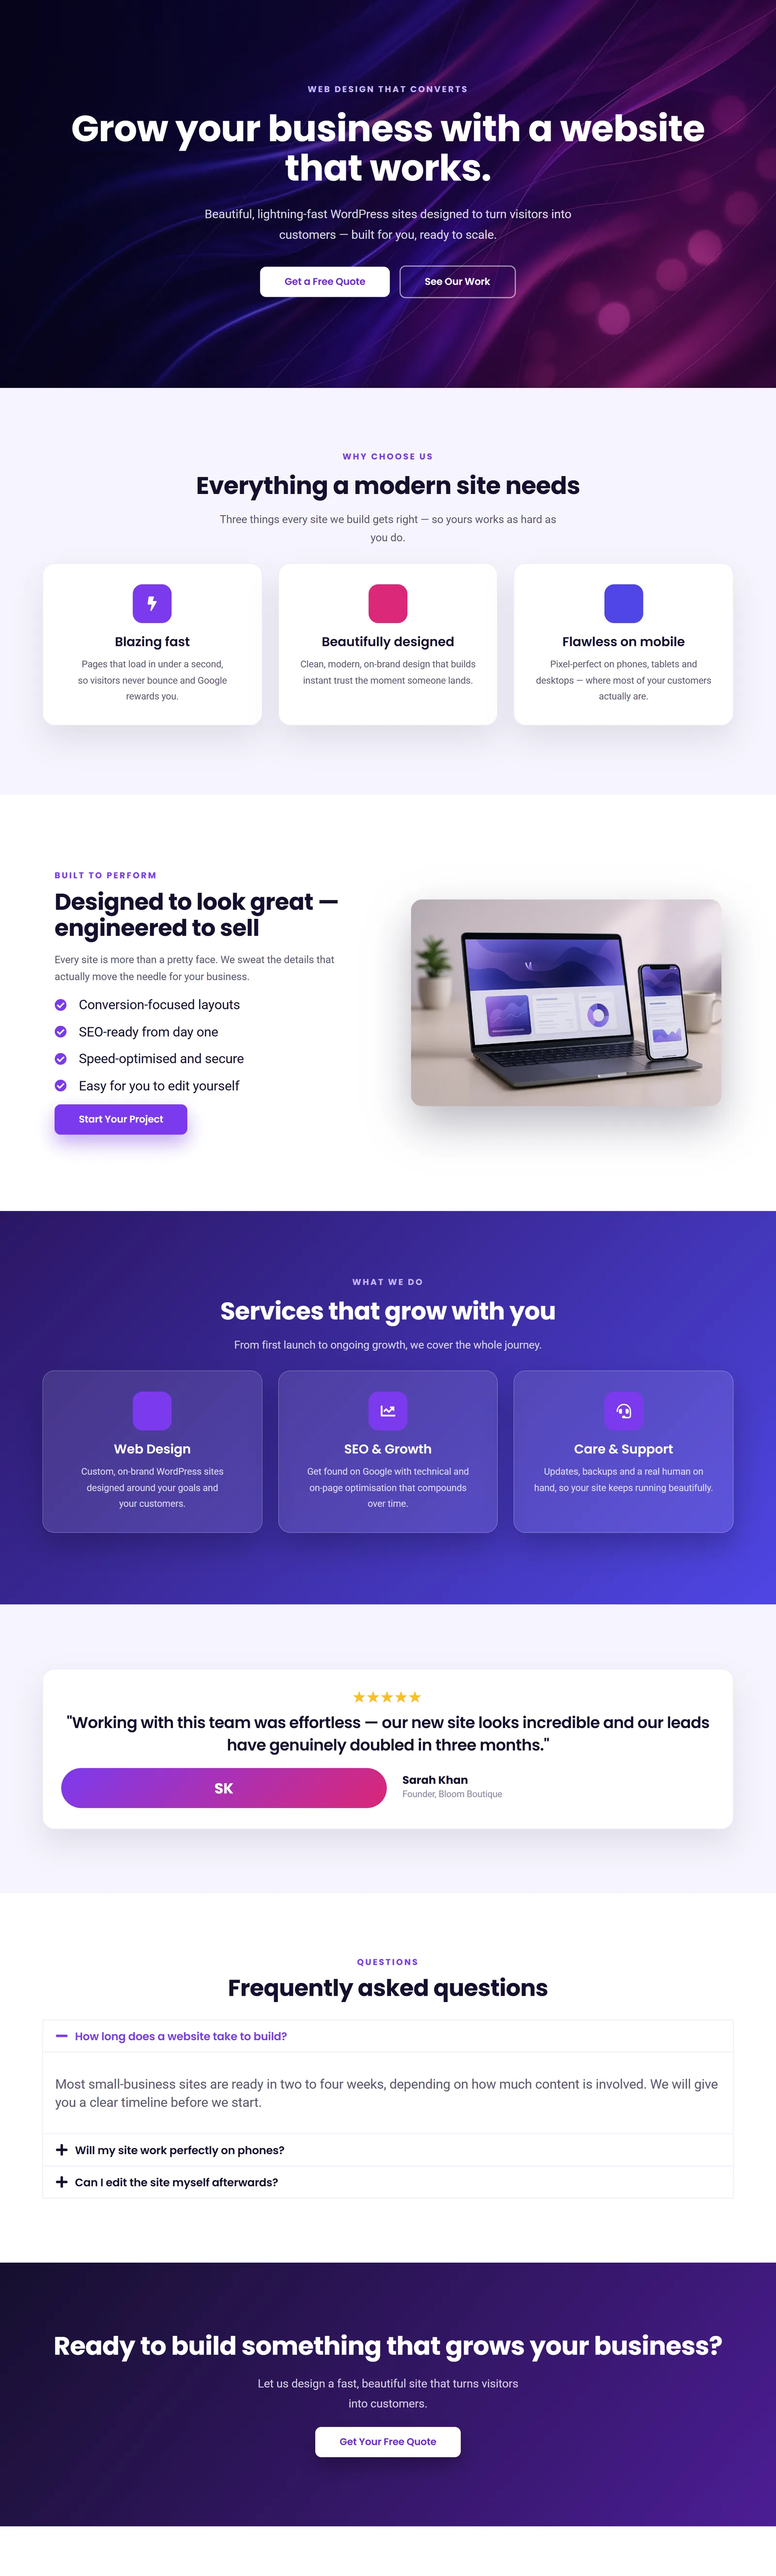
That’s the big realisation: assembling a full page isn’t some advanced skill — it’s simply doing the small builds you’ve already practised, one after another, with a consistent palette and rhythm tying them together.
The workflow pros actually use
Don’t perfect one section before moving to the next — that’s how beginners burn an afternoon on a hero and never finish the page. Instead, work in two passes:
- Pass one — structure. Rough out all seven sections with plain containers and placeholder text. Get the order, the spacing and the overall flow right first. The page will look unfinished, and that’s fine.
- Pass two — polish. Now go back through and style: backgrounds, colors from your globals, card shadows, real images and copy. Because the structure is already solid, this pass is fast and fun.
💡 Steal the structure, not the content. Hero → proof → benefits → offer → social proof → objections → call to action is a flow that works for almost any business. Keep the skeleton; change the words and images to fit yours.
Don’t forget mobile
Before you call it done, switch to mobile mode (Part 8) and walk the whole page top to bottom. Stack the feature and services rows, shrink any headline that’s too large, and tighten the section padding. Ten minutes here is the difference between “looks fine on my laptop” and “looks great everywhere” — and on a landing page, most of your visitors are on a phone.
✅ Try it yourself: Build all seven sections in one go without stopping to perfect anything — get the page end-to-end first. Then do a second pass purely for polish. You’ll be amazed how quickly a real page comes together this way.
🔨 Build this: Complete your landing page — all seven sections, styled and made responsive — and Publish it. That’s a real, finished page you built yourself with Elementor. Take a moment; that’s a genuine, marketable skill you now own.
What’s next
You’ve built a complete page — now let’s make sure you never have to build one from scratch again. In Part 10, the finale, we cover templates and reuse, a tour of the Pro power features (Theme Builder, Forms and Popups), and the best-practice habits that keep your sites fast and tidy. Continue to Part 10 →
Prefer to skip the learning curve and just have a polished site like this built for you? See how I can help build your WordPress site.